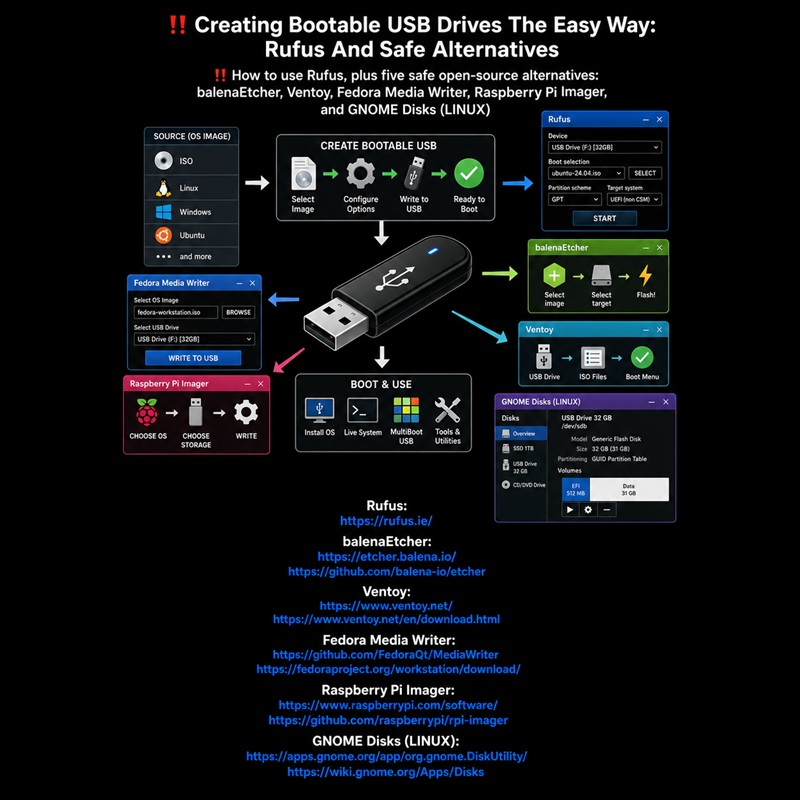
2026 08 17: Creating Bootable USB Drives The Easy Way: Rufus And Safe Alternatives
———————————
———————————
‼️‼️ https://pastebin.com/u/LeGamerInfini
‼️‼️ LAST UPDATE 2026 08 17
‼️‼️ THANK YOU VERY MUCH.
———————————
———————————
–
‼️ Creating Bootable USB Drives The Easy Way: Rufus And Safe Alternatives ‼️ Thank You ‼️
–
———————————
———————————
–
—
–
– SUBTITLE
–
– A practical guide to creating bootable USB drives:
– how to use Rufus, download it from its official website, and verify its digital signature, plus five safe open-source alternatives (Fedora Media Writer, balenaEtcher, Ventoy, Raspberry Pi Imager, and GNOME Disks), with specific recommendations for Bazzite, security precautions (SHA-256 checksum, drive verification, safe ejection), and the complete content provided in both English and French.
–
—
–
———————————
———————————
———————————
———————————
–
—
–
– IN ENGLISH:
–
—
–
– INTRODUCTION
–
– This document is a bilingual (English and French) guide whose purpose is to explain how to create bootable USB drives the easy way.
– It presents Rufus, the well-known utility used to format and create bootable USB flash drives, and explains how to download it safely and how to check its digital signature.
– It then describes five safe alternatives to Rufus — Fedora Media Writer, balenaEtcher, Ventoy, Raspberry Pi Imager, and GNOME Disks — with their official links, their main features, and which tool is recommended for a Bazzite installation.
– Finally, it gives clear security precautions to follow before, during, and after writing an ISO image to a USB drive.
–
—
–
———————————
———————————
———————————
———————————
–
—
–
—
–
– IN SUMMARY:
–
– Rufus:
– https://rufus.ie/
–
– balenaEtcher:
– https://etcher.balena.io/
– https://github.com/balena-io/etcher
–
– Ventoy:
– https://www.ventoy.net/
– https://www.ventoy.net/en/download.html
–
– Fedora Media Writer:
– https://github.com/FedoraQt/MediaWriter
– https://fedoraproject.org/workstation/download/
–
– Raspberry Pi Imager:
– https://www.raspberrypi.com/software/
– https://github.com/raspberrypi/rpi-imager
–
– Win32DiskImager:
– https://sourceforge.net/projects/win32diskimager/
– https://github.com/win32diskimager/win32diskimager
–
– USBImager:
– Official homepage: https://gitlab.com/bztsrc/usbimager
– Official downloads (releases): https://gitlab.com/bztsrc/usbimager/-/releases
– French tutorial (Ubuntu-doc): https://doc.ubuntu-fr.org/tutoriel/usbimager
–
– GNOME Disks (LINUX):
– https://apps.gnome.org/app/org.gnome.DiskUtility/
– https://wiki.gnome.org/Apps/Disks
–
– SD Card Formatter:
– https://www.sdcard.org/downloads/formatter/
–
– GParted:
– Homepage: https://gparted.org/
– ISO download: https://gparted.org/download.php
– Documentation: https://gparted.org/documentation.php
– Detailed manual: https://gparted.org/display-doc.php?name=help-manual
– Support forum: https://gparted.org/support.php
–
– EaseUS Partition Master Professional:
– English official site: https://www.easeus.com/
– English free download page: https://www.easeus.com/partition-manager/epm-free.html
–
– Clonezilla Live:
– Official website or main reference: https://clonezilla.org/
– Download / installation: https://clonezilla.org/downloads.php
–
—
–
– IN DETAIL:
–
– Rufus: Create bootable USB drives the easy way:
– Rufus is a utility that helps format and create bootable USB flash drives, such as USB keys/pendrives, memory sticks, etc.
– https://rufus.ie/
– Download the executable and run it – no installation is necessary.
– The executable is digitally signed and the signature should state:
– “Akeo Consulting” (v1.3.0 or later)
– “Pete Batard – Open Source Developer” (v1.2.0 or earlier)
–
—
–
– SAFE ALTERNATIVES TO RUFUS:
–
– Rufus is not considered dangerous when downloaded from rufus.ie and its digital signature is valid. The main risk shared by all these tools is selecting the wrong drive and erasing its data.
–
– For Bazzite, the safest and most appropriate alternative is Fedora Media Writer, which is officially recommended by the Bazzite documentation.
–
– Fedora Media Writer — Recommended for Bazzite:
– Officially recommended by the Bazzite installation documentation.
– Open source and available for Windows, Linux, and macOS.
– It writes the ISO directly to the USB drive and verifies the result.
– https://github.com/FedoraQt/MediaWriter
– https://fedoraproject.org/workstation/download/
–
– balenaEtcher — Simple and beginner-friendly:
– Open source and available for Windows, Linux, and macOS.
– It validates the completed write and normally hides system drives to reduce the risk of selecting the wrong disk.
– https://etcher.balena.io/
– https://github.com/balena-io/etcher
–
– Ventoy — Recommended for multiboot USB drives:
– Open source and supported by the Bazzite installation documentation.
– It allows multiple ISO files to be stored on the same USB drive.
– Secure Boot may require additional configuration and key enrollment.
– https://www.ventoy.net/
– https://www.ventoy.net/en/download.html
–
– Raspberry Pi Imager — Safe alternative:
– Open source and available for Windows, Linux, and macOS.
– Select “Use Custom” to write a manually downloaded operating-system image.
– Carefully verify the selected USB drive because its contents will be erased.
– Skip Raspberry Pi-specific OS customization options when writing Bazzite.
– Anonymous usage statistics can be disabled in the application settings.
– https://www.raspberrypi.com/software/
– https://github.com/raspberrypi/rpi-imager
–
– Win32DiskImager — Reliable Windows-focused alternative:
– Open source and available for Windows (and Linux via package repositories).
– It writes raw disk images (including ISO files converted to .img) to USB drives or SD cards.
– It also allows reading an image from a drive, which is useful for backups.
– https://sourceforge.net/projects/win32diskimager/
– https://github.com/win32diskimager/win32diskimager
–
– USBImager — Simple and beginner-friendly:
– Open source and available for Windows, Linux, and macOS.
– It writes compressed disk images directly to USB drives and SD cards, and can create full backups of removable media.
– Official homepage: https://gitlab.com/bztsrc/usbimager
– Official downloads (releases): https://gitlab.com/bztsrc/usbimager/-/releases
– French tutorial (Ubuntu-doc): https://doc.ubuntu-fr.org/tutoriel/usbimager
–
– GNOME Disks — Native Linux alternative:
– Open source and available on Linux (usually pre-installed or available in the software repositories).
– It is not available on Windows or macOS.
– It can write an ISO image to a USB drive using the “Restore Disk Image…” option.
– It is a reliable choice for Linux users who prefer a built-in tool.
– https://apps.gnome.org/app/org.gnome.DiskUtility/
– https://wiki.gnome.org/Apps/Disks
–
– SD Card Formatter — Official formatting utility for SD cards:
– Developed by the SD Association, it ensures proper formatting of SD, SDHC, and SDXC cards.
– It is not a bootable USB writer; use it to reset your card before writing an ISO image.
– Recommended for Raspberry Pi users or anyone using SD cards.
– https://www.sdcard.org/downloads/formatter/
–
– GParted is the ideal tool for formatting and partitioning all your disks
– Use the Live USB version to work without an OS or on locked disks
– Choose GPT for modern disks, MBR for older hardware
– ALWAYS verify the correct disk and back up your data BEFORE any operation
– Apply operations only when you are certain of your configuration
– Homepage: https://gparted.org/
– ISO download: https://gparted.org/download.php
– Documentation: https://gparted.org/documentation.php
– Detailed manual: https://gparted.org/display-doc.php?name=help-manual
– Support forum: https://gparted.org/support.php
–
– EaseUS Partition Master Professional is a complete partition manager for Windows, allowing you to resize, create, delete, merge, clone, and convert partitions.
– NOTE: This software is useful for managing internal disks (SSD, HDD) on Windows, but for creating bootable Linux USB drives, tools like Rufus or balenaEtcher are more suitable.
– English official site: https://www.easeus.com/
– English free download page: https://www.easeus.com/partition-manager/epm-free.html
–
– Clonezilla Live
– Platform / architecture: bootable PC.
– Official website or main reference: https://clonezilla.org/
– Download / installation: https://clonezilla.org/downloads.php
– Description: Live system for disk cloning and imaging.
–
– NOTE:
– Raspberry Pi Imager is considered trustworthy, but it is primarily designed for Raspberry Pi devices.
– For creating a standard Bazzite installation USB drive, Fedora Media Writer remains the officially recommended choice.
–
– RECOMMENDATION:
– For a standard Bazzite installation, use Fedora Media Writer.
– Use balenaEtcher if you prefer a very simple three-step interface.
– Use Ventoy only when you need a multiboot USB drive.
– Use GNOME Disks if you are already on Linux and want a built-in solution.
–
– SECURITY PRECAUTIONS:
– Download applications only from their official websites.
– Verify the Bazzite ISO SHA-256 checksum before creating the USB drive.
– Carefully verify the selected USB device because its existing data will be erased.
– Safely eject the USB drive after the writing and verification processes are complete.
–
—
–
—
–
‼️ Essential SSD and storage management software: SSD Cloning & SSD Health Monitoring ‼️THANK YOU‼️
–
–
—
–
‼️ Essential Tools for Your Setup:
– I recommend the following software to manage your storage and peripherals:
–
‼️ Storage & SSD Management:
– EaseUS Disk Copy Pro: The gold standard for cloning your drives effortlessly.
– Macrium Reflect: Excellent for cloning and creating secure system images.
– Hard Disk Sentinel: Crucial for monitoring the health and temperature of your SSDs.
– Samsung Magician: The dedicated tool for maintaining Samsung SSDs.
–
– Below are some links to some software to easily clone/copy your SSD, and some links to some software to monitor the health and temperature of SSDs: there are SSD enclosures that you can connect to a USB port of the PC, in order to copy the SSD that is in the PC to the SSD that has been installed in the enclosure that is connected to a USB port of the PC:
–
– “EaseUS Disk Copy Pro” (the software I used to copy my “Kingston” brand SSD to my “Samsung” brand SSD)
– “EaseUS” creates fundamental software, inexpensive and simple to use.
https://www.easeus.com/disk-copy/clone-resource/clone-hard-drive.html
https://www.easeus.com
–
– “Macrium Reflect” (easily clone/copy your SSD and create an image of your SSD)
https://www.macrium.com/reflectfree
https://www.macrium.com/products/home
https://www.macrium.com/products/home#buy-reflect-home
https://www.macrium.com/
– TUTORIAL: HOW TO EASILY CLONE/COPY YOUR SSD (TUTO 2023):
https://youtu.be/SsYJuo9Yu7U
–
– “Hard Disk Sentinel” (software I used to monitor the health and temperature of SSDs)
https://www.hdsentinel.com/download.php
https://www.hdsentinel.com/
– “Hard Disk Sentinel” (HDSentinel) is a multi-OS SSD and HDD monitoring and analysis software. Its goal is to find, test, diagnose and repair hard disk drive problems, report and display SSD and HDD health, performance degradations and failures. Hard Disk Sentinel gives a complete textual description, tips, and displays/reports the most comprehensive information about the hard disks and solid state disks inside the computer and in external enclosures (USB hard disks / e-SATA hard disks). Many different alerts and report options are available to ensure maximum safety of your valuable data.
–
– “Samsung Magician” Software (software from the Samsung brand to monitor the health and temperature of Samsung brand SSDs, and to allow the updating of Samsung brand SSDs)
https://semiconductor.samsung.com/consumer-storage/support/tools/
–
—
–
—
–
———————————
———————————
———————————
———————————
–
—
–
═══════════════════════════════════════════════════════════════
– GPARTED:
– COMPLETE WINDOWS AND LINUX GUIDE:
– FORMATTING AND PARTITIONING DISKS:
═══════════════════════════════════════════════════════════════
–
— WHAT IS GPARTED? —
–
– GParted (GNOME Partition Editor) is a graphical, free, and open-source partition manager.
– It allows you to create, delete, resize, move, copy, and format partitions.
– It is available as:
– An application installable on your Linux system
– A standalone Live USB / Live CD (GParted Live) to work on disks even without an installed OS
–
– Official websites:
–
– Homepage: https://gparted.org/
– ISO download: https://gparted.org/download.php
– Documentation: https://gparted.org/documentation.php
– Detailed manual: https://gparted.org/display-doc.php?name=help-manual
– Support forum: https://gparted.org/support.php
–
— [1]. INSTALLING GPARTED ON YOUR LINUX SYSTEM —
–
– To install GParted directly on your distribution (if you want to manage disks from your already-installed OS):
–
– Distribution Package Installation command
– Debian gparted sudo apt install gparted
– Ubuntu gparted sudo apt install gparted
– Linux Mint gparted sudo apt install gparted
– Zorin OS gparted sudo apt install gparted
– Fedora gparted su -c “dnf install gparted”
– OpenSUSE gparted sudo zypper install gparted
– Mageia gparted sudo urpmi gparted
– Arch Linux gparted sudo pacman -S gparted
– Gentoo gparted emerge –ask sys-block/gparted
–
– (Note: older Fedora versions used “yum”; on modern Fedora, use “dnf”)
–
— [2]. CREATING A BOOTABLE USB WITH GPARTED LIVE —
–
– GParted Live is a bootable mini-system that allows you to partition disks
– even without an installed operating system (or for disks that are impossible to manage under Windows).
–
– Step 1: Download the ISO image
– Go to: https://gparted.org/download.php
– Download the latest version of gparted-live (.iso file)
–
– Step 2: Burn the ISO to a USB drive
– Under Windows: use Rufus (https://rufus.ie/) in “ISO Image” or “DD” mode
OR balenaEtcher (https://etcher.balena.io/)
– Under Linux: use the built-in image writer, GNOME Disks, or dd
–
– Step 3: Booting from the USB drive
– Insert the USB drive, restart the computer
– At boot, choose the default option (GParted Live)
– Choose your language, then “Start GParted” (or “Pass” to access the command line)
– The desktop appears with GParted launching automatically
–
— [3]. SELECTING THE CORRECT DISK —
–
– ⚠️ CRITICAL STEP: Verify the correct disk before any operation!
– At the top right of GParted, a drop-down menu allows you to choose the disk
– The disks are named /dev/sda, /dev/sdb, /dev/sdc, etc.
– Check the SIZE and MODEL of the disk to be sure you don’t erase the wrong one
– To identify a disk: GParted displays the model, capacity, and partition table
– If in doubt, do NOTHING and ask for help
–
— [4]. CREATING A PARTITION TABLE (GPT OR MBR) —
–
– If the disk is blank or you want to start from scratch:
– a. Menu “Device” → “Create Partition Table”
– b. Choose the type:
– GPT: modern, recommended for UEFI and disks > 2 TB (recent SSDs, Windows/Linux UEFI installations)
– MSDOS (MBR): old, for Legacy BIOS, disks < 2 TB
– c. Click “Apply” to apply
–
– ⚠️ Creating a partition table ERASES ALL DATA on the disk!
–
— [5]. CREATING AND FORMATTING PARTITIONS —
–
– To create a new partition in the unallocated space:
– a. Right-click on the unallocated space → “New”
– b. Configure:
– Size (partition size)
– Type: Primary, Extended, or Logical
– File system (see table below)
– Label (volume name, optional)
– c. Click “Add” → the operation is queued
– d. Click the green checkmark (Apply) to execute all pending operations
–
– To DELETE a partition:
– Right-click on the partition → “Delete”
– Then “Apply” (green checkmark)
–
– To RESIZE / MOVE:
– Right-click → “Resize/Move”
– Drag the edges or enter the values
– IMPORTANT: first unmount the partition if it is mounted
– Then “Apply”
–
— [6]. RECOMMENDED FILE SYSTEMS —
–
– Type Recommended use
– ext4 Standard Linux (recommended for system and data under Linux)
– swap Swap partition (Linux virtual memory)
– NTFS Compatible with Windows and Linux (for sharing with Windows)
– FAT32 Universally compatible, 4 GB per file limit, for USB drives/SD cards
– exFAT For files > 4 GB on removable media
– xfs Efficient for large files (servers, etc.)
– btrfs Modern with snapshots, but more complex
–
— [7]. IMPORTANT PRECAUTIONS ⚠️ —
–
– BACK UP ALL YOUR DATA before formatting: it is IRREVERSIBLE
– ALWAYS verify the correct disk (/dev/sda, /dev/sdb…) before applying
– Unmount mounted partitions before resizing them
– Do not cut the power during an operation (risk of corruption)
– Operations are queued: verify everything BEFORE clicking “Apply”
– In Live USB mode: GParted can manage Windows disks without unmounting them via NTFS-3g
–
— [8]. USEFUL LINUX COMMANDS (ALTERNATIVE TO GPARTED) —
–
– Check connected disks: lsblk
– View detailed partitions: sudo fdisk -l
– Format as ext4: sudo mkfs.ext4 /dev/sdX1
– Format as NTFS: sudo mkfs.ntfs /dev/sdX1
– Format as FAT32: sudo mkfs.fat -F32 /dev/sdX1
– Create a GPT table: sudo parted /dev/sdX mklabel gpt
– Create an MBR table: sudo parted /dev/sdX mklabel msdos
– (replace /dev/sdX with the correct disk)
–
— [9]. IN SUMMARY —
–
– GParted is the ideal tool for formatting and partitioning all your disks
– Use the Live USB version to work without an OS or on locked disks
– Choose GPT for modern disks, MBR for older hardware
– ALWAYS verify the correct disk and back up your data BEFORE any operation
– Apply operations only when you are certain of your configuration
–
═══════════════════════════════════════════════════════════════
–
—
–
———————————
———————————
———————————
———————————
–
—
–
– IN FRENCH:
–
—
–
———————————
———————————
———————————
———————————
–
‼️ Créer Des Clés USB Bootables Facilement : Rufus Et Des Alternatives Sûres ‼️ Merci ‼️
–
———————————
———————————
–
—
–
– SOUS-TITRE
–
– Un guide pratique pour créer des clés USB bootables :
– comment utiliser Rufus, le télécharger depuis son site officiel et vérifier sa signature numérique, plus cinq alternatives open source sûres (Fedora Media Writer, balenaEtcher, Ventoy, Raspberry Pi Imager et GNOME Disks), avec des recommandations spécifiques pour Bazzite, des précautions de sécurité (somme de contrôle SHA-256, vérification du disque, éjection sécurisée), et le contenu complet fourni en anglais et en français.
–
—
–
———————————
———————————
———————————
———————————
–
—
–
– INTRODUCTION
–
– Ce document est un guide bilingue (anglais et français) dont le but est d’expliquer comment créer des clés USB bootables facilement.
– Il présente Rufus, l’utilitaire bien connu utilisé pour formater et créer des clés USB amorçables, et explique comment le télécharger en toute sécurité et comment vérifier sa signature numérique.
– Il décrit ensuite cinq alternatives sûres à Rufus — Fedora Media Writer, balenaEtcher, Ventoy, Raspberry Pi Imager et GNOME Disks — avec leurs liens officiels, leurs principales fonctionnalités, et l’outil recommandé pour une installation de Bazzite.
– Enfin, il donne des précautions de sécurité claires à suivre avant, pendant et après l’écriture d’une image ISO sur une clé USB.
–
—
–
———————————
———————————
———————————
———————————
–
—
–
—
–
– EN RÉSUMÉ :
–
– Rufus :
– https://rufus.ie/
–
– balenaEtcher :
– https://etcher.balena.io/
– https://github.com/balena-io/etcher
–
– Ventoy :
– https://www.ventoy.net/
– https://www.ventoy.net/en/download.html
–
– Fedora Media Writer :
– https://github.com/FedoraQt/MediaWriter
– https://fedoraproject.org/workstation/download/
–
– Raspberry Pi Imager :
– https://www.raspberrypi.com/software/
– https://github.com/raspberrypi/rpi-imager
–
– Win32DiskImager :
– https://sourceforge.net/projects/win32diskimager/
– https://github.com/win32diskimager/win32diskimager
–
– USBImager :
– Page d’accueil officielle : https://gitlab.com/bztsrc/usbimager
– Téléchargements officiels (versions) : https://gitlab.com/bztsrc/usbimager/-/releases
– Tutoriel français (Ubuntu-doc) : https://doc.ubuntu-fr.org/tutoriel/usbimager
–
– GNOME Disks (sur LINUX) :
– https://apps.gnome.org/app/org.gnome.DiskUtility/
– https://wiki.gnome.org/Apps/Disks
–
– SD Card Formatter :
– https://www.sdcard.org/downloads/formatter/
–
– GParted :
– Page d’accueil : https://gparted.org/
– Téléchargement de l’ISO : https://gparted.org/download.php
– Documentation : https://gparted.org/documentation.php
– Manuel détaillé : https://gparted.org/display-doc.php?name=help-manual
– Forum d’entraide : https://gparted.org/support.php
–
– EaseUS Partition Master Professional:
– Site officiel (anglais) : https://www.easeus.com/
– Lien français (téléchargement) : https://www.easeus.fr/partition-manager/telecharger-partition-master-free.html
–
– Clonezilla Live :
– Site officiel ou référence principale : https://clonezilla.org/
– Téléchargement / installation : https://clonezilla.org/downloads.php
–
—
–
– EN DÉTAIL :
–
– Rufus : créez facilement des clés USB amorçables :
– Rufus est un utilitaire qui permet de formater et de créer des supports USB amorçables, notamment des clés USB et des cartes mémoire.
– https://rufus.ie/
– Téléchargez le fichier exécutable et lancez-le : aucune installation n’est nécessaire.
– Le fichier exécutable possède une signature numérique qui doit indiquer :
– « Akeo Consulting » pour la version 1.3.0 ou une version ultérieure ;
– « Pete Batard – Open Source Developer » pour la version 1.2.0 ou une version antérieure.
–
—
–
– ALTERNATIVES FIABLES À RUFUS :
–
– Rufus n’est pas considéré comme dangereux lorsqu’il est téléchargé depuis rufus.ie et que sa signature numérique est valide. Le principal risque commun à tous ces outils est de sélectionner le mauvais disque et d’effacer ses données.
–
– Pour Bazzite, l’alternative la plus sûre et la plus appropriée est Fedora Media Writer, officiellement recommandé par la documentation de Bazzite.
–
– Fedora Media Writer — Recommandé pour Bazzite :
– Il est officiellement recommandé par la documentation d’installation de Bazzite.
– Son code source est ouvert et il est disponible pour Windows, Linux et macOS.
– Il écrit directement l’image ISO sur le support USB et vérifie le résultat.
– https://github.com/FedoraQt/MediaWriter
– https://fedoraproject.org/workstation/download/
–
– balenaEtcher – Simple et adapté aux débutants :
– Son code source est ouvert et il est disponible pour Windows, Linux et macOS.
– Il vérifie l’écriture terminée et masque normalement les disques système afin de réduire le risque de sélectionner le mauvais disque.
– https://etcher.balena.io/
– https://github.com/balena-io/etcher
–
– Ventoy — Recommandé pour les clés USB multiboot :
– Son code source est ouvert et il est pris en charge par la documentation d’installation de Bazzite.
– Il permet de conserver plusieurs images ISO sur la même clé USB.
– Secure Boot peut nécessiter une configuration supplémentaire et l’enregistrement d’une clé.
– https://www.ventoy.net/
– https://www.ventoy.net/en/download.html
–
– Raspberry Pi Imager — Alternative fiable :
– Son code source est ouvert et il est disponible pour Windows, Linux et macOS.
– Sélectionnez « Use Custom » afin d’écrire une image de système d’exploitation téléchargée manuellement.
– Vérifiez soigneusement le support USB sélectionné, car toutes les données qu’il contient seront effacées.
– Ignorez les options de personnalisation propres au Raspberry Pi lorsque vous écrivez l’image de Bazzite.
– Les statistiques d’utilisation anonymes peuvent être désactivées dans les paramètres de l’application.
– https://www.raspberrypi.com/software/
– https://github.com/raspberrypi/rpi-imager
–
– Win32DiskImager — Alternative fiable orientée Windows :
– Son code source est ouvert et il est disponible pour Windows (et Linux via les dépôts).
– Il écrit des images disque brutes (y compris des fichiers ISO convertis en .img) sur des clés USB ou des cartes SD.
– Il permet également de lire une image depuis un support, ce qui est utile pour les sauvegardes.
– https://sourceforge.net/projects/win32diskimager/
– https://github.com/win32diskimager/win32diskimager
–
– USBImager — Simple et adapté aux débutants :
– Open source et disponible pour Windows, Linux et macOS.
– Il écrit des images disque compressées directement sur des clés USB et des cartes SD, et peut créer des sauvegardes complètes de supports amovibles.
– Page d’accueil officielle : https://gitlab.com/bztsrc/usbimager
– Téléchargements officiels (versions) : https://gitlab.com/bztsrc/usbimager/-/releases
– Tutoriel français (Ubuntu-doc) : https://doc.ubuntu-fr.org/tutoriel/usbimager
–
– GNOME Disks — Alternative native Linux :
– Son code source est ouvert et il est disponible sur Linux (généralement préinstallé ou disponible dans les dépôts logici els).
– Il n’est pas disponible sous Windows ou macOS.
– Il peut écrire une image ISO sur une clé USB via l’option « Restaurer une image disque… ».
– C’est un choix fiable pour les utilisateurs Linux qui préfèrent un outil intégré.
– https://apps.gnome.org/app/org.gnome.DiskUtility/
– https://wiki.gnome.org/Apps/Disks
–
– SD Card Formatter — Utilitaire officiel de formatage pour cartes SD :
– Développé par la SD Association, il garantit un formatage correct des cartes SD, SDHC et SDXC.
– Ce n’est pas un outil pour créer des supports bootables ; utilisez-le pour réinitialiser votre carte avant d’écrire une image ISO.
– Recommandé pour les utilisateurs de Raspberry Pi ou pour toute personne utilisant des cartes SD.
– https://www.sdcard.org/downloads/formatter/
–
– GParted est l’outil idéal pour formater et partitionner tous tes disques
– Utilise la version Live USB pour travailler sans OS ou sur des disques verrouillés
– Choisis GPT pour les disques modernes, MBR pour l’ancien matériel
– Vérifie TOUJOURS le bon disque et sauvegarde tes données AVANT toute opération
– Applique les opérations uniquement quand tu es certain de ta configuration
– Page d’accueil : https://gparted.org/
– Téléchargement de l’ISO : https://gparted.org/download.php
– Documentation : https://gparted.org/documentation.php
– Manuel détaillé : https://gparted.org/display-doc.php?name=help-manual
– Forum d’entraide : https://gparted.org/support.php
–
– EaseUS Partition Master Professional est un gestionnaire de partitions complet pour Windows, permettant de redimensionner, créer, supprimer, fusionner, cloner et convertir des partitions.
– NOTE : Ce logiciel est utile pour gérer les disques internes (SSD, HDD) sous Windows, mais pour la création de clés USB bootables Linux, les outils comme Rufus ou balenaEtcher restent plus adaptés.
– Site officiel (anglais) : https://www.easeus.com/
– Lien français (téléchargement) : https://www.easeus.fr/partition-manager/telecharger-partition-master-free.html
–
– Clonezilla Live – Système live pour le clonage et l’imagerie de disques.
– Plateforme / architecture : PC bootable.
– Site officiel ou référence principale : https://clonezilla.org/
– Téléchargement / installation : https://clonezilla.org/downloads.php
–
– REMARQUE :
– Raspberry Pi Imager est considéré comme fiable, mais il est principalement conçu pour les appareils Raspberry Pi.
– Pour créer une clé USB d’installation standard de Bazzite, Fedora Media Writer reste le choix officiellement recommandé.
–
– RECOMMANDATION :
– Pour une installation standard de Bazzite, utilisez Fedora Media Writer.
– Utilisez balenaEtcher si vous préférez une interface très simple en trois étapes.
– Utilisez Ventoy uniquement si vous avez besoin d’une clé USB multiboot.
– Utilisez GNOME Disks si vous êtes déjà sous Linux et souhaitez une solution intégrée.
–
– PRÉCAUTIONS DE SÉCURITÉ :
– Téléchargez les applications uniquement depuis leurs sites officiels.
– Vérifiez la somme de contrôle SHA-256 de l’image ISO de Bazzite avant de créer la clé USB.
– Vérifiez soigneusement le support USB sélectionné, car les données qu’il contient seront effacées.
– Éjectez correctement la clé USB lorsque les opérations d’écriture et de vérification sont terminées.
–
—
–
—
–
‼️ Logiciels essentiels de gestion des SSD et du stockage : clonage de SSD et surveillance de la santé des SSD ‼️MERCI‼️
–
—
–
‼️ Outils essentiels pour votre configuration :
– Je recommande les logiciels suivants pour gérer votre stockage et vos périphériques :
–
‼️ Gestion du stockage et des SSD :
– EaseUS Disk Copy Pro : la référence absolue pour cloner vos disques sans effort.
– Macrium Reflect : excellent pour cloner et créer des images système sécurisées.
– Hard Disk Sentinel : indispensable pour surveiller la santé et la température de vos SSD.
– Samsung Magician : l’outil dédié à la maintenance des SSD Samsung.
–
– Vous trouverez ci-dessous des liens vers des logiciels pour cloner/copier facilement votre SSD, ainsi que des liens vers des logiciels pour surveiller la santé et la température des SSD : il existe des boîtiers SSD que vous pouvez connecter à un port USB du PC, afin de copier le SSD qui se trouve dans le PC vers le SSD qui a été installé dans le boîtier connecté à un port USB du PC :
–
– « EaseUS Disk Copy Pro » (le logiciel que j’ai utilisé pour copier mon SSD de marque « Kingston » vers mon SSD de marque « Samsung »)
– « EaseUS » crée des logiciels fondamentaux, peu coûteux et simples à utiliser.
https://www.easeus.com/disk-copy/clone-resource/clone-hard-drive.html
https://www.easeus.com
–
– « Macrium Reflect » (clonez/copiez facilement votre SSD et créez une image de votre SSD)
https://www.macrium.com/reflectfree
https://www.macrium.com/products/home
https://www.macrium.com/products/home#buy-reflect-home
https://www.macrium.com/
– TUTORIEL : COMMENT CLONER/COPIER FACILEMENT VOTRE SSD (TUTO 2023) :
https://youtu.be/SsYJuo9Yu7U
–
– « Hard Disk Sentinel » (logiciel que j’ai utilisé pour surveiller la santé et la température des SSD)
https://www.hdsentinel.com/download.php
https://www.hdsentinel.com/
– « Hard Disk Sentinel » (HDSentinel) est un logiciel multi-OS de surveillance et d’analyse des SSD et HDD. Son objectif est de détecter, tester, diagnostiquer et réparer les problèmes de disque dur, de rapporter et d’afficher la santé des SSD et HDD, les dégradations de performances et les pannes. Hard Disk Sentinel fournit une description textuelle complète, des conseils, et affiche/rapporte les informations les plus complètes sur les disques durs et les SSD présents dans l’ordinateur et dans les boîtiers externes (disques durs USB / disques durs e-SATA). De nombreuses options d’alertes et de rapports sont disponibles pour garantir une sécurité maximale de vos données précieuses.
–
– Logiciel « Samsung Magician » (logiciel de la marque Samsung pour surveiller la santé et la température des SSD Samsung, et permettre la mise à jour des SSD Samsung)
https://semiconductor.samsung.com/consumer-storage/support/tools/
–
—
–
—
–
———————————
———————————
———————————
———————————
–
—
–
═══════════════════════════════════════════════════════════════
– GPARTED :
– GUIDE COMPLET WINDOWS ET LINUX :
– FORMATER ET PARTITIONNER DES DISQUES:
═══════════════════════════════════════════════════════════════
–
— QU’EST-CE QUE GPARTED ? —
–
– GParted (GNOME Partition Editor) est un gestionnaire de partitions graphique, libre et open source.
– Il permet de créer, supprimer, redimensionner, déplacer, copier et formater des partitions.
– Il est disponible en tant que :
– Application installable sur votre système Linux
– Live USB / Live CD autonome (GParted Live) pour travailler sur des disques même sans OS installé
–
– Sites officiels :
–
– Page d’accueil : https://gparted.org/
– Téléchargement de l’ISO : https://gparted.org/download.php
– Documentation : https://gparted.org/documentation.php
– Manuel détaillé : https://gparted.org/display-doc.php?name=help-manual
– Forum d’entraide : https://gparted.org/support.php
–
— [1]. INSTALLATION DE GPARTED SUR TON SYSTÈME LINUX —
–
– Pour installer GParted directement dans ta distribution (si tu veux gérer des disques depuis ton OS déjà installé) :
–
– Distribution Paquet Commande d’installation
– Debian gparted sudo apt install gparted
– Ubuntu gparted sudo apt install gparted
– Linux Mint gparted sudo apt install gparted
– Zorin OS gparted sudo apt install gparted
– Fedora gparted su -c “dnf install gparted”
– OpenSUSE gparted sudo zypper install gparted
– Mageia gparted sudo urpmi gparted
– Arch Linux gparted sudo pacman -S gparted
– Gentoo gparted emerge –ask sys-block/gparted
–
– (Remarque : les anciennes versions Fedora utilisaient “yum” ; sur Fedora moderne, utiliser “dnf”)
–
— [2]. CRÉER UNE CLÉ USB BOOTABLE AVEC GPARTED LIVE —
–
– GParted Live est un mini-système bootable qui te permet de partitionner des disques
– même sans système d’exploitation installé (ou pour des disques impossibles à gérer sous Windows).
–
– Étape 1 : Télécharger l’image ISO
– Rends-toi sur : https://gparted.org/download.php
– Télécharge la dernière version de gparted-live (fichier .iso)
–
– Étape 2 : Graver l’ISO sur une clé USB
– Sous Windows : utilise Rufus (https://rufus.ie/) en mode “Image ISO” ou “DD”
OU balenaEtcher (https://etcher.balena.io/)
– Sous Linux : utilise le graveur d’images intégré, GNOME Disks, ou dd
–
– Étape 3 : Démarrage sur la clé USB
– Insère la clé USB, redémarre l’ordinateur
– Au boot, choisis l’option par défaut (GParted Live)
– Choisis la langue, puis “Start GParted” (ou “Pass” pour accéder à la ligne de commande)
– Le bureau s’affiche avec GParted qui se lance automatiquement
–
— [3]. SÉLECTIONNER LE BON DISQUE —
–
– ⚠️ ÉTAPE CRITIQUE : Vérifier le bon disque avant toute opération !
– En haut à droite de GParted, un menu déroulant permet de choisir le disque
– Les disques sont nommés /dev/sda, /dev/sdb, /dev/sdc, etc.
– Vérifie la TAILLE et le MODÈLE du disque pour être sûr de ne pas effacer le mauvais
– Pour identifier un disque : GParted affiche le modèle, la capacité, et la table de partitions
– En cas de doute, ne fais RIEN et demande de l’aide
–
— [4]. CRÉER UNE TABLE DE PARTITIONS (GPT OU MBR) —
–
– Si le disque est vierge ou si tu veux repartir de zéro :
– a. Menu “Device” (Périphérique) → “Create Partition Table” (Créer une table de partitions)
– b. Choisis le type :
– GPT : moderne, recommandé pour UEFI et disques > 2 To (SSD récents, installations Windows/Linux UEFI)
– MSDOS (MBR) : ancien, pour BIOS Legacy, disques < 2 To
– c. Clique sur “Apply” pour appliquer
–
– ⚠️ Créer une table de partitions EFFACE TOUTES LES DONNÉES du disque !
–
— [5]. CRÉER ET FORMATER DES PARTITIONS —
–
– Pour créer une nouvelle partition dans l’espace non alloué :
– a. Clic droit sur l’espace non alloué → “New” (Nouveau)
– b. Configure :
– Taille (taille de la partition)
– Type : Primary (primaire), Extended (étendue), ou Logical (logique)
– Système de fichiers (voir tableau ci-dessous)
– Label (nom du volume, optionnel)
– c. Clique sur “Add” (Ajouter) → l’opération est mise en file d’attente
– d. Clique sur la coche verte (Apply / Appliquer) pour exécuter toutes les opérations en attente
–
– Pour SUPPRIMER une partition :
– Clic droit sur la partition → “Delete” (Supprimer)
– Puis “Apply” (coche verte)
–
– Pour REDIMENSIONNER / DÉPLACER :
– Clic droit → “Resize/Move” (Redimensionner/Déplacer)
– Fais glisser les bords ou entre les valeurs
– IMPORTANT : démonte d’abord la partition si elle est montée
– Puis “Apply”
–
— [6]. SYSTÈMES DE FICHIERS RECOMMANDÉS —
–
– Type Usage recommandé
– ext4 Standard Linux (recommandé pour système et données sous Linux)
– swap Partition d’échange (mémoire virtuelle Linux)
– NTFS Compatible Windows et Linux (pour partager avec Windows)
– FAT32 Compatible universel, limites 4 Go par fichier, pour clés USB/cartes SD
– exFAT Pour fichiers > 4 Go sur supports amovibles
– xfs Performant pour gros fichiers (serveurs, etc.)
– btrfs Moderne avec snapshots, mais plus complexe
–
— [7]. PRÉCAUTIONS IMPORTANTES ⚠️ —
–
– SAUVEGARDE TOUTES TES DONNÉES avant de formater : c’est IRRÉVERSIBLE
– Vérifie TOUJOURS le bon disque (/dev/sda, /dev/sdb…) avant d’appliquer
– Démonte les partitions montées avant de les redimensionner
– Ne coupe pas l’alimentation pendant une opération (risque de corruption)
– Les opérations sont en file d’attente : vérifie tout AVANT de cliquer sur “Apply”
– En mode Live USB : GParted peut gérer des disques Windows sans les démonter via NTFS-3g
–
— [8]. COMMANDES LINUX UTILES (EN ALTERNATIVE À GPARTED) —
–
– Vérifier les disques connectés : lsblk
– Voir les partitions détaillées : sudo fdisk -l
– Formater en ext4 : sudo mkfs.ext4 /dev/sdX1
– Formater en NTFS : sudo mkfs.ntfs /dev/sdX1
– Formater en FAT32 : sudo mkfs.fat -F32 /dev/sdX1
– Créer une table GPT : sudo parted /dev/sdX mklabel gpt
– Créer une table MBR : sudo parted /dev/sdX mklabel msdos
– (remplacer /dev/sdX par le bon disque)
–
— [9]. EN RÉSUMÉ —
–
– GParted est l’outil idéal pour formater et partitionner tous tes disques
– Utilise la version Live USB pour travailler sans OS ou sur des disques verrouillés
– Choisis GPT pour les disques modernes, MBR pour l’ancien matériel
– Vérifie TOUJOURS le bon disque et sauvegarde tes données AVANT toute opération
– Applique les opérations uniquement quand tu es certain de ta configuration
–
═══════════════════════════════════════════════════════════════
–
—
–
———————————
———————————
———————————
———————————
‼️‼️ THANK YOU VERY MUCH ‼️‼️
‼️‼️ MERCI BEAUCOUP ‼️‼️
———————————
———————————
———————————
———————————
– KEYWORDS: Rufus, balenaEtcher, Ventoy, Fedora Media Writer, Raspberry Pi Imager, GNOME Disks, Bootable USB, GParted, Win32DiskImager, SD Card Formatter, EaseUS Partition Master Professional
– MOTS-CLÉS : Rufus, balenaEtcher, Ventoy, Fedora Media Writer, Raspberry Pi Imager, GNOME Disks, clé USB bootable, GParted, Win32DiskImager, SD Card Formatter, EaseUS Partition Master Professional
 The Real Antichrist
Leave a comment